Document Creation How-tos
This page provides various short how-to guides for accomplishing often needed tasks when creating a PDF document.
Creating Table of Contents Entries
A table of contents entry usually has the section heading on the left side of the line, followed by e.g. dots and the page number of the right side. The number of dots varies based on the length of the section heading and page number.
Using the style property fill_horizontal it is easily possible to create such lines:
require 'hexapdf'

HexaPDF::Composer.create('toc.pdf', page_size: [0, 0, 300, 100], margin: 10) do |composer|
  composer.style(:base, margin: [0, 0, 10])
  composer.formatted_text(['Heading', {text: '.', fill_horizontal: 1}, '42'])
  composer.formatted_text(['Some other heading', {text: '_', fill_horizontal: 1}, '96'])
  overlay = proc {|c, b| c.line(0, 0, b.width, 0).stroke}
  composer.formatted_text(['Third heading',
                           {text: "\u{00a0}", fill_horizontal: 1, overlays: [overlay]},
                           '123'])
end

The third TOC line uses the non-breaking space character to ensure horizontal filling is done since ordinary spaces are handled specially during text layouting. Since the non-breaking spaces won’t show in the PDF, the visual representation is done using an overlay.
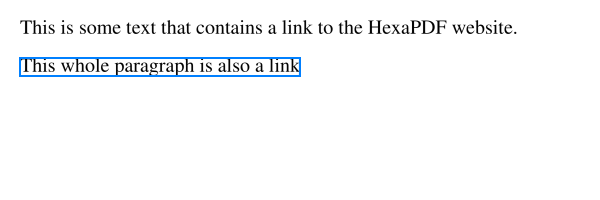
Creating a Link to a Website
It is possible to add a link to a website to any box by using a LinkLayer instance together with the overlay or underlay layers. By default a link has no additional visual clues like a border but this can be customized.
Additionally, text fragments can be assigned a link using a formatted_text shortcurt.
require 'hexapdf'

HexaPDF::Composer.create('links.pdf', page_size: [0, 0, 300, 100], margin: 10) do |composer|
  composer.formatted_text(['This is some text that contains ',
                           {text: 'a link', link: 'http:/hexapdf.gettalong.org'},
                           ' to the HexaPDF website.'], margin: [0, 0, 10])
  composer.text('This whole paragraph is also a link',
                overlays: [[:link, uri: 'https://duckduckgo.com', border: true, border_color: 'hp-blue']])
end
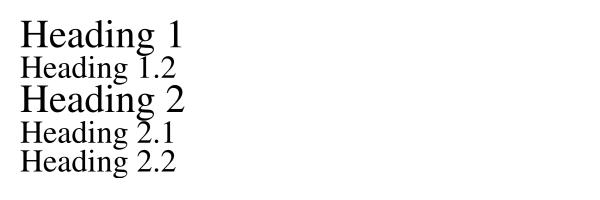
Automatically Creating Outline Items
While creating outline items after building a document is possible, one can also create the outline items when a section heading is drawn.
For this to work heading styles for each type of heading have to be defined. Those styles use an underlay (or overlay) that doesn’t draw anything but just builds the respective outline item. By storing the last created item in e.g. a local variable, it is easily possible to nest the items, provided the styles are used correctly.
require 'hexapdf'

HexaPDF::Composer.create('outline.pdf', page_size: [0, 0, 300, 100], margin: 10) do |composer|
  main = composer.document.outline
  level1 = nil
  layer_heading1 = proc do |canvas, box|
    next unless box.kind_of?(HexaPDF::Layout::TextBox)
    dest = {page: canvas.context, type: :xyz, top: canvas.pos(0, box.height)}
    level1 = main.add_item(box.text, destination: dest)
  end
  layer_heading2 = proc do |canvas, box|
    next unless box.kind_of?(HexaPDF::Layout::TextBox)
    dest = {page: canvas.context, type: :xyz, top: canvas.pos(0, box.height)}
    level1.add_item(box.text, destination: dest)
  end
  composer.style(:heading1, font_size: 20, underlays: [layer_heading1])
  composer.style(:heading2, font_size: 16, underlays: [layer_heading2])
  composer.text('Heading 1', style: :heading1)
  composer.text('Heading 1.2', style: :heading2)
  composer.text('Heading 2', style: :heading1)
  composer.text('Heading 2.1', style: :heading2)
  composer.text('Heading 2.2', style: :heading2)
end