class HexaPDF::
| Parent | Object |
|---|---|
| Included Modules |
HexaPDF::Utils::MathHelpers HexaPDF::Utils::GraphicsHelpers |
This class provides the basic drawing operations supported by PDF.
General Information¶ ↑
A canvas object is used for modifying content streams on a level higher than text. It would be possible to write a content stream by hand since PDF uses a simplified reversed polish notation for specifying operators: First come the operands, then comes the operator and no operator returns any result. However, it is easy to make mistakes this way and one has to know all operators and their operands.
This is rather tedious and therefore this class exists. It allows one to modify a content stream by invoking methods that should be familiar to anyone that has ever used a graphics API. There are methods for moving the current point, drawing lines and curves, setting the color, line width and so on.
The PDF operators themselves are implemented as classes, see Operator. The canvas class uses the Operator::BaseOperator#invoke and Operator::BaseOperator#serialize methods for applying changes and serialization, with one exception: color setters don’t invoke the corresponding operator implementation but work directly on the graphics state.
General Graphics State Manipulation Methods¶ ↑
Transformation Methods¶ ↑
Path Construction Methods¶ ↑
Path Painting Methods¶ ↑
Path Related Graphics State Methods¶ ↑
Text Related Methods¶ ↑
Other Methods¶ ↑
PDF Graphics¶ ↑
Graphics Operators and Objects¶ ↑
There are about 60 PDF content stream operators. Some are used for changing the graphics state, some for drawing paths and others for showing text. This is all abstracted through the Canvas class.
PDF knows about five different graphics objects: path objects, text objects, external objects, inline image objects and shading objects. If none of the five graphics objects is current, the content stream is at the so called page description level (in between graphics objects).
Additionally the PDF operators are divided into several groups, like path painting or text showing operators, and such groups of operators are allowed to be used only in certain graphics objects or the page description level.
Have a look at the PDF specification (PDF2.0 s8.2) for more details.
HexaPDF tries to ensure the proper use of the operators and graphics objects and if it cannot do it, an error is raised. So if you don’t modify a content stream directly but via the Canvas methods, you generally don’t have to worry about the low-level inner workings.
Graphics State¶ ↑
Some operators modify the so called graphics state (see GraphicsState). The graphics state is a collection of settings that is used during processing or creating a content stream. For example, the path painting operators don’t have operands to specify the line width or the stroke color but take this information from the graphics state.
One important thing about the graphics state is that it is only possible to restore a prior state using the save and restore methods. It is not possible to reset the graphics state while creating the content stream!
This means, for example, if you use a clipping path (see clip_path) you should first save the graphics state (save_graphics_state) and then restore it afterwards (restore_graphics_state). Otherwise all following operations will be clipped to the clipping path.
Paths¶ ↑
A PDF path object consists of one or more subpaths. Each subpath can be a rectangle or can consist of lines and cubic bezier curves. No other types of subpaths are known to PDF. However, the Canvas class contains additional methods that use the basic path construction methods for drawing other paths like circles.
When a subpath is started, the current graphics object is changed to :path. After all path constructions are finished, a path painting method needs to be invoked to change back to the page description level. Optionally, the path painting method may be preceeded by a clipping path method to change the current clipping path (see clip_path).
There are four kinds of path painting methods:
-
Those that stroke the path,
-
those that fill the path,
-
those that stroke and fill the path and
-
one to neither stroke or fill the path (used, for example, to just set the clipping path).
In addition filling may be done using either the nonzero winding number rule or the even-odd rule.
See: PDF2.0 s8, s9
Attributes
The serialized contents produced by the various canvas operations up to this point.
Note that the returned string may not be a completely valid PDF content stream since a graphic object may be open or the graphics state may not be completely restored.
See: stream_data
The context for which the canvas was created (a HexaPDF::Type::Page or HexaPDF::Type::Form object).
The context object is used for two things:
-
To store the resources (
resources) that are needed by the canvas (e.g. font references). -
To access the
HexaPDF::Documentobject to which this canvas and the context object belongs. This is used internally but it is also useful in other situations since some parts ofHexaPDFonly yield a canvas object, and not also the underlying document object.
The current point [x, y] of the path.
This attribute holds the current point which is only valid if the current graphics object (see graphic_object) is :path.
When the current point changes, the array is modified in place instead of creating a new array!
The current graphics object.
The graphics object should not be changed directly! It is automatically updated by the invoked methods.
This attribute can have the following values:
- :none
-
No current graphics object, i.e. the page description level.
- :path
-
The current graphics object is a path.
- :clipping_path
-
The current graphics object is a clipping path.
- :text
-
The current graphics object is a text object.
See: PDF2.0 s8.2
The GraphicsState object containing the current graphics state.
The graphics state must not be changed directly, only by using the provided methods. If it is changed directly, the output will not be correct.
The operator name/implementation map used when invoking or serializing an operator.
Defaults to Operator::DEFAULT_OPERATORS, i.e. the standard implementation provided by HexaPDF.
A StreamData object representing the serialized contents produced by the various canvas operations.
In contrast to contents, it is ensured that an open graphics object is closed and all saved graphics states are restored when the contents of the stream data object is read.
Note that this means that reading the stream data object may change the state of the canvas!
Public Class Methods
Creates a new Canvas object for the given context object (either a HexaPDF::Type::Page or a HexaPDF::Type::Form).
This method is usually not invoked directly but through HexaPDF::Type::Page#canvas or HexaPDF::Type::Form#canvas to make sure the contents of the canvas is properly assigned to the context object.
Examples:
doc = HexaPDF::Document.new
canvas = doc.pages.add.canvas
Public Instance Methods
Appends an elliptical arc to the path and returns self. The endpoint of the arc becomes the new current point.
cx-
x-coordinate of the center point of the arc
cy-
y-coordinate of the center point of the arc
a-
Length of semi-major axis
b-
Length of semi-minor axis (default:
a) start_angle-
Angle in degrees at which to start the arc (default: 0)
end_angle-
Angle in degrees at which to end the arc (default: 360)
clockwise-
If
truethe arc is drawn in clockwise direction, otherwise in counterclockwise direction (default: false). inclination-
Angle in degrees between the x-axis and the semi-major axis (default: 0)
If a and b are equal, a circular arc is drawn. If the difference of the start angle and end angle is equal to 360, a full ellipse (or circle) is drawn.
If there is no current path when the method is invoked, a new path is automatically begun.
This arc does not start from the current point (current_point). If this functionality is needed, use draw together with GraphicObject::EndpointArc.
Since PDF doesn’t have operators for drawing elliptical or circular arcs, they have to be approximated using Bezier curves (see curve_to). The accuracy of the approximation can be controlled using the configuration option ‘graphic_object.arc.max_curves’.
Examples:
canvas.arc(50, 150, a: 10)                         # Circle with radius 10
canvas.arc(100, 150, a: 10, b: 5)                  # Ellipse with radii 10 and 5
canvas.arc(150, 150, a: 10, b: 5, inclination: 45) # The above ellipse inclined 45 degrees
canvas.stroke

# Circular and elliptical arcs from 30 degrees to 160 degrees
canvas.stroke_color("hp-blue")
canvas.arc(50, 100, a: 10, start_angle: 30, end_angle: 160)
canvas.arc(100, 100, a: 10, b: 5, start_angle: 30, end_angle: 160)
canvas.stroke

# Arcs from 135 degrees to 30 degrees, the first in counterclockwise direction (i.e. the
# big arc), the other in clockwise direction (i.e. the small arc)
canvas.stroke_color("hp-orange")
canvas.arc(50, 50, a: 10, start_angle: 135, end_angle: 30)
canvas.arc(100, 50, a: 10, start_angle: 135, end_angle: 30, clockwise: true)
canvas.stroke
See: arc, circle, ellipse, GraphicObject::Arc, GraphicObject::EndpointArc
Begins a new text object and returns self.
If force is true and the current graphics object is already a text object, it is ended and a new text object is begun.
It is not necessary to invoke this method manually in most cases since it is automatically called when needed by other methods, i.e. the text method.
The character spacing determines how much additional space is added after each character (or, more correctly, after each glyph). For horizontal writing positive values increase the distance between two characters, whereas for vertical writing negative values increase the distance.
Note that the character spacing is applied to all characters that are rendered. This has the effect that there is also a space after the last character which might not be wanted in certain cases (e.g. when justifying text).
Returns the current character spacing value (see GraphicsState#character_spacing) when no argument is given. Otherwise sets the character spacing using the amount argument and returns self. The setter version can also be called in the character_spacing= form.
If the amount and a block are provided, the changed character spacing is only active during the block by saving and restoring the graphics state.
Examples:
canvas.character_spacing(0.25)
canvas.character_spacing                      # => 0.25
canvas.character_spacing = 0.5                # => 0.5

canvas.character_spacing(0.10) do
  canvas.character_spacing                    # => 0.10
end
canvas.character_spacing                      # => 0.5

# visual example
canvas.font("Helvetica", size: 10)
canvas.character_spacing = 0                  # initial value
canvas.text("This is an example", at: [10, 150])
# show that the text cursor is directly after the last glyph
x, y = canvas.text_cursor
canvas.stroke_color("hp-blue").line(x, y, x, y + 10).stroke

canvas.character_spacing = 5
canvas.text("This is an example", at: [10, 100])
# visualize the spacing after the last glyph
x, y = canvas.text_cursor
canvas.stroke_color("hp-blue").line(x, y, x, y + 10).stroke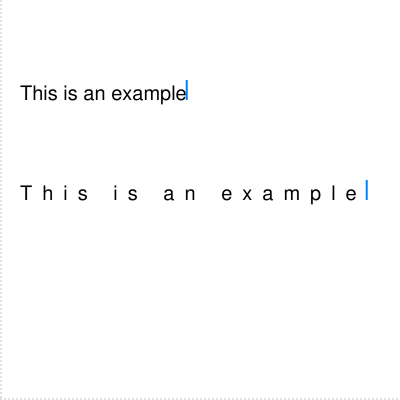
See: PDF2.0 s9.3.2, word_spacing, horizontal_scaling
Appends a circle with center (cx, cy) and the given radius (in degrees) to the path as a complete subpath (drawn in counterclockwise direction). The point (center_x + radius, center_y) becomes the new current point. Returns self.
If there is no current path when the method is invoked, a new path is automatically begun.
Examples:
canvas.circle(100, 100, 30)
cp = canvas.current_point
canvas.stroke
canvas.stroke_color("hp-orange").line(*cp, 180, 100).stroke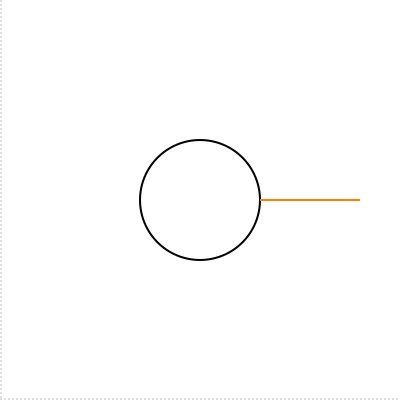
Modifies the clipping path by intersecting it with the current path. Returns self.
The argument rule may either be :nonzero to use the nonzero winding number rule or :even_odd to use the even-odd rule for determining which regions lie inside the clipping path. Details on how these rules work are found in the PDF 2.0 spec section 8.5.3.3 or via Internet search.
The initial clipping path includes the entire canvas. Once the clipping path is reduced to a subset of the canvas, there is no way to enlarge it. To restrict the effect of this method, use save_graphics_state before modifying the clipping path.
Note that the current path cannot be modified after invoking this method! This means that one of the path painting methods or end_path must be called immediately afterwards.
Examples:
canvas.ellipse(100, 100, a: 50, b: 30).   # Restrict operations to this intersecting path
  ellipse(100, 100, a: 30, b: 50).        # where the inside is not part of it
  clip_path(:even_odd).end_path
canvas.rectangle(0, 0, 200, 200).fill     # Fills everything inside the clipping path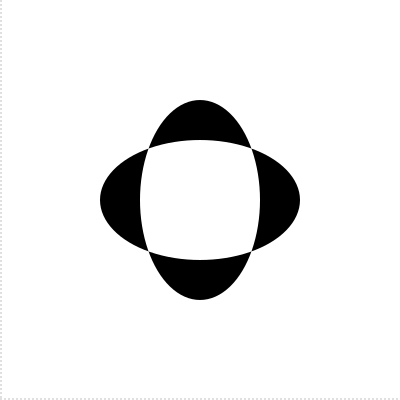
See: PDF2.0 s8.5.4, end_path
Closes the last subpath and then fills and strokes the path using the given rule. Returns self.
The argument rule may either be :nonzero to use the nonzero winding number rule or :even_odd to use the even-odd rule for determining which regions to fill in. Details on how these rules work are found in the PDF 2.0 spec section 8.5.3.3 or via Internet search.
Examples:
canvas.stroke_color("hp-orange").line_width(3)
canvas.fill_color("hp-blue").
  polyline(20, 10, 90, 60, 10, 60, 80, 10, 50, 90).
  close_fill_stroke

canvas.fill_color("hp-teal").
  polyline(120, 110, 190, 160, 110, 160, 180, 110, 150, 190).
  close_fill_stroke(:even_odd)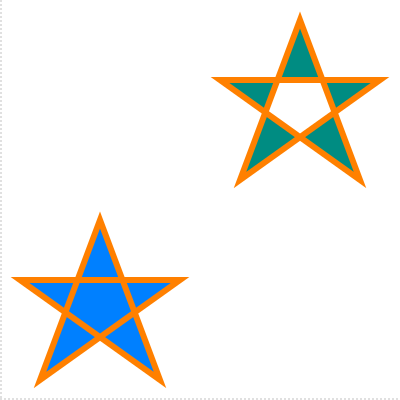
See: PDF2.0 s8.5.3, fill, fill_stroke
Closes the last subpath and then strokes the path. Returns self.
Examples:
canvas.polyline(10, 10, 120, 40, 50, 160)      # No line from the top to the left
canvas.close_stroke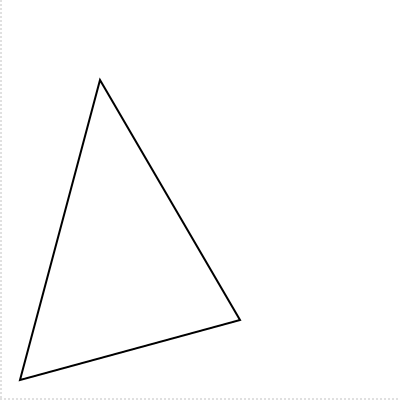
See: PDF2.0 s8.5.3.1, s8.5.3.2, stroke, close_fill_stroke
Closes the current subpath by appending a straight line from the current point to the start point of the subpath which also becomes the new current point. Returns self.
If there is no current path when the method is invoked, an error is raised since a valid current point (current_point) is needed.
Examples:
canvas.move_to(10, 10).
  line_to(110, 10).
  line_to(60, 60).
  close_subpath.           # Draws the line from (60, 60) to (10, 10)
  stroke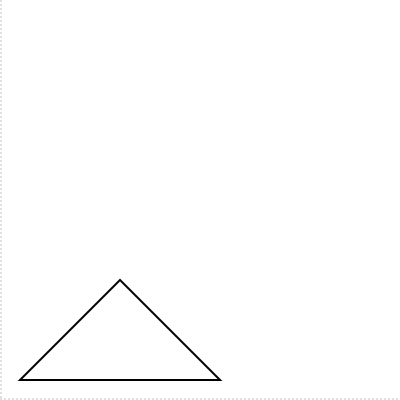
See: PDF2.0 s8.5.2.1
Creates and returns a color object from the given color specification. See stroke_color for details on the possible color specifications.
This utility method is meant for use by higher-level methods that need to convert a color specification into a color object.
Creates a CanvasComposer object for composing content using high-level document layout features, yields it, if a block is given, and returns it.
The margin can be any value allowed by HexaPDF::Layout::Style::Quad#set and defines the margin that should not be used during composition. For the remaining area of the canvas a frame object will be created.
Examples:
canvas.composer(margin: [10, 30]) do |composer|
  composer.image(machu_picchu, height: 30, position: :float)
  composer.lorem_ipsum(position: :flow)
end
Appends a cubic Bezier curve to the current subpath starting from the current point and returns self. The end point becomes the new current point.
If there is no current path when the method is invoked, an error is raised since a valid current point (current_point) is needed.
A Bezier curve consists of the start point, the end point and the two control points p1 and p2. The start point is always the current point and the end point is specified as the x and y arguments.
Additionally, either the first control point p1 or the second control p2 or both control points have to be specified (as arrays containing two numbers). If the first control point is not specified, the current point is used as first control point. If the second control point is not specified, the end point is used as the second control point.
Examples:
canvas.move_to(10, 50).
  curve_to(80, 80, p1: [10, 70], p2: [50, 100]).
  curve_to(90, -20, p1: [50, 50]).
  curve_to(-30, 60, p2: [-20, -40])
canvas.current_point                        # => [-30, 60]
canvas.stroke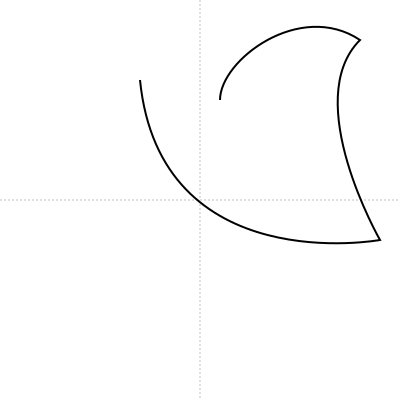
Draws the given graphic object on the canvas.
This is the same as “graphic_object(obj_or_name, **options).draw(self)”.
See graphic_object for details on the arguments and invocation.
Appends an ellipse with center (cx, cy), semi-major axis a, semi-minor axis b and an inclination from the x-axis of inclination degrees to the path as a complete subpath. The outer-most point on the positive semi-major axis becomes the new current point. Returns self.
If there is no current path when the method is invoked, a new path is automatically begun.
Examples:
# Ellipse aligned to x-axis and y-axis
canvas.ellipse(50, 50, a: 20, b: 10).stroke

# Inclined ellipse with line from the end point
canvas.stroke_color("hp-blue").
  ellipse(150, 150, a: 20, b: 10, inclination: 30)
cp = canvas.current_point
x, y = 2 * canvas.current_point[0] - 150, 2 * canvas.current_point[1] - 150
canvas.stroke.
  stroke_color("hp-orange").line(*cp, x, y).stroke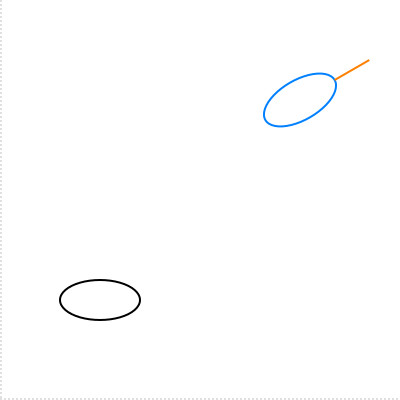
Ends a marked-content sequence and returns self.
See marked_content_sequence for details.
See: PDF2.0 s14.6, marked_content_sequence, marked_content_point
Ends an optional content sequence and returns self.
See optional_content for details.
See: PDF2.0 s8.11
Ends the path without stroking or filling it and returns self.
This method is usually used in conjunction with the clipping path methods to define the clipping path.
Examples:
canvas.line(10, 10, 100, 100)
canvas.end_path                    # Nothing to see here!
See: PDF2.0 s8.5.3.1, clip_path
Ends the current text object and returns self.
It is not necessary to invoke this method manually in most cases since it is automatically called when needed by other methods, i.e. when creating a new path.
See: PDF2.0 s9.4.1, begin_text
Fills the path using the given rule and returns self.
The argument rule may either be :nonzero to use the nonzero winding number rule or :even_odd to use the even-odd rule for determining which regions to fill in. Details on how these rules work are found in the PDF 2.0 spec section 8.5.3.3 or via Internet search.
Any open subpaths are implicitly closed before being filled.
Examples:
canvas.fill_color("hp-blue").
  polyline(20, 10, 90, 60, 10, 60, 80, 10, 50, 90).
  fill

canvas.fill_color("hp-orange").
  polyline(120, 110, 190, 160, 110, 160, 180, 110, 150, 190).
  fill(:even_odd)
See: PDF2.0 s8.5.3.1, s8.5.3.3, fill_stroke, close_fill_stroke
The fill color defines the color used for non-stroking operations, i.e. for filling paths.
Works exactly the same as stroke_color but for the fill color. See stroke_color for details on invocation and use.
Fills and then strokes the path using the given rule. Returns self.
The argument rule may either be :nonzero to use the nonzero winding number rule or :even_odd to use the even-odd rule for determining which regions to fill in. Details on how these rules work are found in the PDF 2.0 spec section 8.5.3.3 or via Internet search.
Note that any open subpaths are not closed concerning the stroking operation.
Examples:
canvas.stroke_color("hp-orange").line_width(3)
canvas.fill_color("hp-blue").
  polyline(20, 10, 90, 60, 10, 60, 80, 10, 50, 90).
  fill_stroke                 # Note the missing stroke from the top corner

canvas.fill_color("hp-teal").
  polyline(120, 110, 190, 160, 110, 160, 180, 110, 150, 190).
  fill_stroke(:even_odd)      # Note the missing stroke from the top corner
See: PDF2.0 s8.5.3.1, s8.5.3.3, fill, close_fill_stroke
Specifies the font and optional the font size that should be used when showing text.
A valid font size needs to be provided on the first invocation, otherwise an error is raised (this is due to how setting a font works with PDFs).
If size is specified, the font_size method is invoked with it as argument.
All other options are passed on to the font loaders (see HexaPDF::FontLoader) that are used for loading the specified font. One standard keyword argument for fonts is :variant which specifies the font variant to use, with standard values of :none, :italic, :bold and :bold_italic.
Returns the current font object when no argument is given, otherwise returns self. Note that this is the font object itself, not the PDF dictionary representing the font that is stored in the resources.
Examples:
canvas.font("Times", variant: :bold, size: 10)
canvas.font                                          # => font object
canvas.font = "Times"

# visual example
canvas.text("Times at size 10", at: [10, 150])
canvas.font("Times", variant: :bold_italic, size: 15)
canvas.text("Times bold+italic at size 15", at: [10, 100])
canvas.font("Times bold")
canvas.text("Times bold using the variant-from-name method", at: [10, 50])
Specifies the font size.
Note that an error is raised if no font has been set before via font (this is due to how setting font and font size works in PDF).
Returns the current font size when no argument is given, otherwise returns self. The setter version can also be called in the font_size= form.
Examples:
canvas.font("Helvetica", size: 10)     # Necessary only the first time
canvas.font_size(12)
canvas.font_size                       # => 12
canvas.font_size = 10

# visual example
6.step(to: 20, by: 2).each_with_index do |size, index|
  canvas.font_size(size)
  canvas.text("Text in size #{size}", at: [15, 180 - index * 20])
end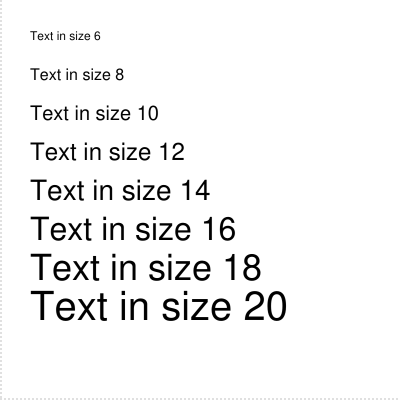
Creates a reusable Form XObject, yields its canvas and then returns it.
If no arguments are provided, the bounding box of the form is the same as that of the context object of this canvas. Otherwise you need to provide the width and height for the form.
Once the form has been created, it can be used like an image and drawn mulitple times with the xobject method. Note that the created form object is independent of this canvas and its context object. This means it can also be used with other canvases.
Examples:
form = canvas.form do |form_canvas|
  form_canvas.fill_color("hp-blue").line_width(5).
    rectangle(10, 10, 80, 80).fill_stroke
end
canvas.xobject(form, at: [0, 0])
canvas.xobject(form, width: 50, at: [100, 100])
See: HexaPDF::Type::Form
Returns the named graphic object, configured with the given options.
If an object responding to :configure is given, it is used. Otherwise the graphic object is looked up via the given name in the configuration option ‘graphic_object.map’. Either way, the graphic object is then configured with the given options if at least one is given.
Examples:
obj = canvas.graphic_object(:solid_arc, cx: 100, cy: 100, inner_a: 20, inner_b: 10,
                            outer_a: 50, outer_b: 40, end_angle: 135)
canvas.draw(obj).stroke
See: draw, GraphicObject
The horizontal scaling adjusts the width of text character glyphs by stretching or compressing them in the horizontal direction. The value is specified as percent of the normal width, so 100 means no scaling.
Returns the current horizontal scaling value (see GraphicsState#horizontal_scaling) when no argument is given. Otherwise sets the horizontal scaling using the percent argument and returns self. The setter version can also be called in the horizontal_scaling= form.
If the percent and a block are provided, the changed horizontal scaling is only active during the block by saving and restoring the graphics state.
Examples:
canvas.horizontal_scaling(50)                  # each glyph has only 50% width
canvas.horizontal_scaling                      # => 50
canvas.horizontal_scaling = 125                # => 125

canvas.horizontal_scaling(75) do
  canvas.horizontal_scaling                    # => 75
end
canvas.horizontal_scaling                      # => 125

# visual example
canvas.font("Helvetica", size: 10)
canvas.horizontal_scaling = 100                  # initial value
canvas.text("This is an example text.", at: [10, 150])
canvas.horizontal_scaling = 50
canvas.text("This is an example text.", at: [10, 100])
See: PDF2.0 s9.3.4, character_spacing, word_spacing
The leading specifies the vertical distance between the baselines of adjacent text lines. It defaults to 0 if not changed.
It is only used by HexaPDF when invoking move_text_cursor with offset set to nil. There are other PDF content stream operators that would be effected but those are not used by the canvas.
Returns the current leading value (see GraphicsState#leading) when no argument is given. Otherwise sets the leading using the amount argument and returns self. The setter version can also be called in the leading= form.
If the amount and a block are provided, the changed leading is only active during the block by saving and restoring the graphics state.
Examples:
canvas.leading(14.5)
canvas.leading                      # => 14.5
canvas.leading = 10                 # => 10

canvas.leading(25) do
  canvas.leading                    # => 25
end
canvas.leading                      # => 10

# visual example
canvas.font("Helvetica", size: 10)
canvas.leading = 15
canvas.text("This is an example text.\nwith a second\nand thrid line", at: [10, 150])
See: PDF2.0 s9.3.5, move_text_cursor
The line cap style specifies how the ends of stroked, open paths should look like.
The style parameter can be one of (also see LineCapStyle):
- :butt or 0
-
Stroke is squared off at the endpoint of a path.
- :round or 1
-
A semicircular arc is drawn at the endpoint of a path.
- :projecting_square or 2
-
The stroke continues half the line width beyond the endpoint of a path.
Note that the return value is always a normalized line cap style (i.e. a NamedValue).
Returns the current line cap style (see GraphicsState#line_cap_style) when no argument is given. Otherwise sets the line cap style to the given style and returns self. The setter version can also be called in the line_cap_style= form.
If the style and a block are provided, the changed line cap style is only active during the block by saving and restoring the graphics state.
Examples:
canvas.line_cap_style(:butt)
canvas.line_cap_style               # => #<NamedValue @name=:butt, @value=0>
canvas.line_cap_style = :round      # => #<NamedValue @name=:round, @value=1>

canvas.line_cap_style(:butt) do
  canvas.line_cap_style             # => #<NamedValue @name=:butt, @value=0>
end
canvas.line_cap_style               # => #<NamedValue @name=:round, @value=1>

# visual example
[:butt, :round, :projecting_square].each_with_index do |style, index|
   canvas.line_cap_style(style).
     line_width(10).stroke_color("black").
     line(50 + index * 50, 30, 50 + index * 50, 170).stroke
   canvas.stroke_color("white").line_width(1).line_cap_style(:butt).
     line(50 + index * 50, 30, 50 + index * 50, 170).stroke
end
See: PDF2.0 s8.4.3.3, Content::LineCapStyle
The line dash pattern defines the appearance of a stroked path (line or curve), ie. if it is solid or if it contains dashes and gaps.
There are multiple ways to set the line dash pattern:
-
By providing a
LineDashPatternobject -
By providing a single Integer/Float that is used for both dashes and gaps
-
By providing an array of Integers/Floats that specify the alternating dashes and gaps
The phase (i.e. the distance into the dashes/gaps at which to start) can additionally be set in the last two cases.
A solid line can be achieved by using 0 for the length or by using an empty array.
Returns the current line dash pattern (a LineDashPattern object, see GraphicsState#line_dash_pattern) when no argument is given. Otherwise sets the line dash pattern using the given arguments and returns self. The setter version can also be called in the line_dash_pattern= form (but only without the second argument!).
If arguments and a block are provided, the changed line dash pattern is only active during the block by saving and restoring the graphics state.
Examples:
canvas.line_dash_pattern(10)
canvas.line_dash_pattern                # => LineDashPattern.new([10], 0)
canvas.line_dash_pattern(10, 2)
canvas.line_dash_pattern([5, 3, 1], 2)
canvas.line_dash_pattern = HexaPDF::Content::LineDashPattern.new([5, 3, 1], 1)

canvas.line_dash_pattern(10) do
  canvas.line_dash_pattern              # => LineDashPattern.new([10], 0)
end
canvas.line_dash_pattern                # => LineDashPattern.new([5, 3, 1], 1)

# visual example
[10, [10, 2], [[5, 3, 1], 2]].each_with_index do |pattern, index|
   canvas.line_dash_pattern(*pattern)
   canvas.line_width(10).line(50 + index * 50, 30, 50 + index * 50, 170).
     stroke
end
See: PDF2.0 s8.4.3.5, LineDashPattern
The line join style specifies the shape that is used at the corners of stroked paths.
The style parameter can be one of (also see LineJoinStyle):
- :miter or 0
-
The outer lines of the two segments continue until the meet at an angle.
- :round or 1
-
An arc of a circle is drawn around the point where the segments meet.
- :bevel or 2
-
The two segments are finished with butt caps and the space between the ends is filled with a triangle.
Note that the return value is always a normalized line join style (i.e. a NamedValue).
Returns the current line join style (see GraphicsState#line_join_style) when no argument is given. Otherwise sets the line join style to the given style and returns self. The setter version can also be called in the line_join_style= form.
If the style and a block are provided, the changed line join style is only active during the block by saving and restoring the graphics state.
Examples:
canvas.line_join_style(:miter)
canvas.line_join_style               # => #<NamedValue @name=:miter, @value=0>
canvas.line_join_style = :round      # => #<NamedValue @name=:round, @value=1>

canvas.line_join_style(:bevel) do
  canvas.line_join_style             # => #<NamedValue @name=:bevel, @value=2>
end
canvas.line_join_style               # => #<NamedValue @name=:round, @value=1>

# visual example
[:miter, :round, :bevel].each_with_index do |style, index|
   canvas.line_join_style(style).
     line_width(10).stroke_color("black").
     polyline(20 + index * 60, 30, 40 + index * 60, 170, 60 + index * 60, 30).stroke
   canvas.stroke_color("white").line_width(1).line_join_style(:bevel).
     polyline(20 + index * 60, 30, 40 + index * 60, 170, 60 + index * 60, 30).stroke
end
See: PDF2.0 s8.4.3.4, Content::LineJoinStyle
Appends a straight line segment from the current point to the given point (which becomes the new current point) to the current subpath and returns self.
If there is no current path when the method is invoked, an error is raised since a valid current point (current_point) is needed.
Examples:
canvas.move_to(10, 50)
canvas.line_to(80, 80)
canvas.current_point                      # => [80, 80]
canvas.stroke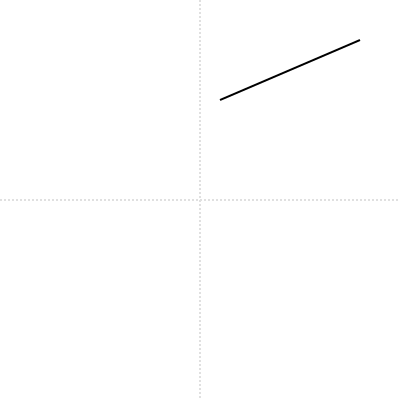
The line width determines the thickness of a stroked path.
Note that half the line width lies on either side of the path. For example, if a path from (0, 0) to (0, 100) is drawn with a line width of 20, the stroked path is actually 20 units wide, from -10 to 10. And if a rectangle is drawn stroked, but not filled, from (20, 20) with a width and height of 20 and a line width of 10, the “inside” of the rectangle would only be from (25, 25) to (35, 35). Also see the examples below.
Returns the current line width (see GraphicsState#line_width) when no argument is given. Otherwise sets the line width to the given width and returns self. The setter version can also be called in the line_width= form.
If the width and a block are provided, the changed line width is only active during the block by saving and restoring the graphics state.
Examples:
canvas.line_width(10).
  line(10, 100, 10, 190).stroke
canvas.line_width          # => 10
canvas.line_width = 5      # => 5
canvas.line(60, 100, 60, 190).stroke

canvas.line_width(10) do
  canvas.line_width        # => 10
  canvas.line(110, 100, 110, 190).stroke
end
canvas.line_width          # => 5
canvas.line(160, 100, 160, 190).stroke

canvas.line_width(10).rectangle(20, 20, 20, 20).stroke      # The rectangle
canvas.fill_color("hp-blue").rectangle(25, 25, 10, 10).fill # The inside
See: PDF2.0 s8.4.3.2
Appends a line with a rounded corner at (x1, y1) from the current point and returns self. The end point of the rounded corner (i.e. out_radius units from (x1, y1) in the direction of (x2, y2)) becomes the current point. In degraded cases the corner point (x1, y1) becomes the current point.
The corner is specified by (x0, y0) which defaults to the current_point of the path, (x1, y1) and (x2, y2) - all of which need to be different points. The in_radius specifies the corner radius into the corner and the out_radius the one out of the corner. Degraded cases, like with (x0, y0) == (x1, y1), are handled gracefully.
There has to be a current path when this method is invoked, otherwise an error is raised. For example, the current point could be estabilshed beforehand using move_to.
Examples:
canvas.move_to(10, 180)   # Both radii are the same
canvas.line_with_rounded_corner(180, 180, 180, 100, in_radius: 20)
canvas.move_to(10, 150)   # Different radii
canvas.line_with_rounded_corner(180, 150, 180, 100, in_radius: 50, out_radius: 20)
canvas.move_to(10, 120)   # One radius is zero, making it just a line
canvas.line_with_rounded_corner(180, 120, 150, 100, in_radius: 0, out_radius: 10)
canvas.stroke

# Special effects when (x0, y0) is not the current point, like when the current
# point would be equal to the corner point. Rounded rectangle use this method
# internally, as high-lighted by the blue segment.
canvas.rectangle(10, 10, 60, 60, radius: 60).stroke
canvas.stroke_color("hp-blue").
  move_to(70, 10). # Start point at the end of the lower-left rounded corner
  line_with_rounded_corner(10, 10, 70, 10, 70, 70, in_radius: 60).stroke
canvas.stroke_color("black").
  rectangle(110, 10, 60, 60, radius: 70).stroke
Inserts a marked-content point, optionally associated with a property list. Returns self.
A marked-content point is used to identify a position in the content stream for later use by other applications. The symbol tag is used to uniquely identify the role of the marked-content point and should be registered with ISO to avoid conflicts.
The optional property_list argument can either be a valid PDF dictionary or a symbol referencing an already used property list in the resource dictionary’s /Properties dictionary.
Examples:
canvas.marked_content_point(:Divider)
canvas.marked_content_point(:Divider, property_list: {Key: 'value'})
See: PDF2.0 s14.6, marked_content_sequence, end_marked_content_sequence
Inserts a marked-content sequence, optionally associated with a property list. Returns self.
A marked-content sequence is used to identify a sequence of complete graphics objects in the content stream for later use by other applications, e.g. for tagged PDF. The symbol tag is used to uniquely identify the role of the marked-content sequence and should be registered with ISO to avoid conflicts.
The optional property_list argument can either be a valid PDF dictionary or a symbol referencing an already used property list in the resource dictionary’s /Properties dictionary.
If invoked without a block, a corresponding call to end_marked_content_sequence must be done. Otherwise the marked-content sequence automatically ends when the block is finished.
Although the PDF specification would allow using marked-content sequences inside text objects, this is prohibited in HexaPDF.
Examples:
canvas.marked_content_sequence(:Divider)
# Other instructions
canvas.end_marked_content_sequence

canvas.marked_content_sequence(:Divider, property_list: {Key: 'value'}) do
  # Other instructions
end
See: PDF2.0 s14.6, end_marked_content_sequence, marked_content_point
The miter limit specifies the maximum ratio of the miter length to the line width for mitered line joins (see line_join_style). When the limit is exceeded, a bevel join is used instead of a miter join.
Returns the current miter limit (see GraphicsState#miter_limit) when no argument is given. Otherwise sets the miter limit to the given limit and returns self. The setter version can also be called in the miter_limit= form.
If the limit and a block are provided, the changed miter limit is only active during the block by saving and restoring the graphics state.
Examples:
canvas.miter_limit(10)
canvas.miter_limit          # => 10
canvas.miter_limit = 5      # => 5

canvas.miter_limit(10) do
  canvas.miter_limit        # => 10
end
canvas.miter_limit          # => 5

# visual example
[10, 5].each_with_index do |limit, index|
   canvas.miter_limit(limit)
   canvas.line_width(10).polyline(20 + index * 80, 30, 40 + index * 80, 170,
                                  60 + index * 80, 30).stroke
end
See: PDF2.0 s8.4.3.5
Moves the text cursor by modifying the text and text line matrices. Returns self.
If offset is not specified, the text cursor is moved to the start of the next text line using leading as vertical offset.
Otherwise, the arguments offset, which has to be an array of the form [x, y], and absolute work together:
-
If
absoluteistrue, then the text and text line matrices are set to [1, 0, 0, 1, x, y], placing the origin of text space, and therefore the text cursor, at [x, y].Note that
absolutehas to be understood in terms of the text matrix since for the actual rendering the current transformation matrix is multiplied with the text matrix. -
If
absoluteisfalse, then the text cursor is moved to the start of the next line, offset from the start of the current line (the origin of the text line matrix) byoffset.
If the current graphics object is not a text object, begin_text is automatically called because the text matrix is only available within a text object.
Examples:
canvas.font("Helvetica", size: 10)
canvas.move_text_cursor(offset: [30, 150])
canvas.text("Absolutely positioned at (30, 150)")

canvas.move_text_cursor(offset: [20, -15], absolute: false)
canvas.text("Relative offset (20, -15)")

canvas.leading(30)
canvas.move_text_cursor
canvas.text("Text on next line with leading=30")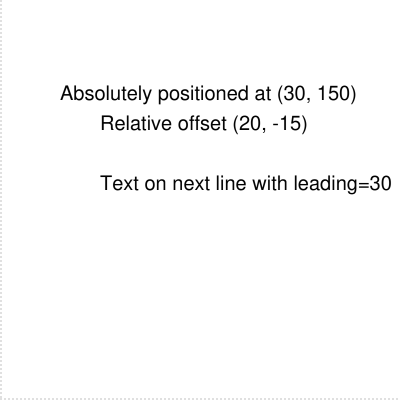
See: PDF2.0 s9.4.2, leading, text_cursor, text, show_glyphs
The fill and stroke alpha values determine how opaque drawn elements will be. Note that the fill alpha value applies not just to fill values but to all non-stroking operations (e.g. images, …).
Returns the current fill alpha (see GraphicsState#fill_alpha) and stroke alpha (see GraphicsState#stroke_alpha) values using a hash with the keys :fill_alpha and :stroke_alpha when no argument is given. Otherwise sets the fill and stroke alpha values and returns self. The setter version can also be called in the opacity= form.
If the values are set and a block is provided, the changed alpha values are only active during the block by saving and restoring the graphics state.
Examples:
canvas.opacity(fill_alpha: 0.5)
canvas.opacity                               # => {fill_alpha: 0.5, stroke_alpha: 1.0}
canvas.opacity(fill_alpha: 0.4, stroke_alpha: 0.9)
canvas.opacity                               # => {fill_alpha: 0.4, stroke_alpha: 0.9}

canvas.opacity(stroke_alpha: 0.7) do
  canvas.opacity                             # => {fill_alpha: 0.4, stroke_alpha: 0.7}
end
canvas.opacity                               # => {fill_alpha: 0.4, stroke_alpha: 0.9}

# visual example
canvas.opacity(fill_alpha: 1, stroke_alpha: 1)
canvas.fill_color("hp-gray-light").                 # background rectangle on right side
  rectangle(100, 0, 100, 200).fill
canvas.opacity(fill_alpha: 0.5, stroke_alpha: 0.8). # foreground rectangle, with a thick
  line_width(20).                                   # stroke that also overlays the
  fill_color("hp-blue").stroke_color("hp-blue").    # inside of the rectangle, creating
  rectangle(20, 20, 160, 160).fill_stroke           # multiple shadings due to opacity
See: PDF2.0 s11.6.4.4
Inserts an optional content sequence. Returns self.
An optional content sequence marks part of the content stream as belonging to the given optional content group. See HexaPDF::Type::OptionalContentProperties for details.
If the first argument is already an optional content group dictionary, it is used. Otherwise, the first argument needs to be the name of the optional content group. In that case, the use_existing_ocg specifies whether the first found optional content group with that name should be used or whether a new OCG should always be created.
If invoked without a block, a corresponding call to end_optional_content must be done. Otherwise the optional content sequence automatically ends when the block is finished.
Examples:
canvas.optional_content('Hints')
# Other instructions
canvas.end_optional_content

canvas.optional_content('Hints', use_existing_ocg: false) do
  # Other instructions
end
See: PDF2.0 s8.11, end_optional_content, HexaPDF::Type::OptionalContentProperties
Appends a polygon consisting of the given points to the path as a complete subpath and returns self. The point (x0, y0 + radius) becomes the new current point.
If radius is greater than 0, the corners are rounded with the given radius.
If there is no current path when the method is invoked, a new path is automatically begun.
Examples:
canvas.polygon(10, 10, 90, 10, 70, 90, 20, 100).stroke
canvas.stroke_color("hp-blue").
  polygon(130, 130, 150, 100, 170, 150, 130, 190, radius: 10).stroke
See: polyline
Moves the current point to (x0, y0) and appends line segments between all given consecutive points, i.e. between (x0, y0) and (x1, y1), between (x1, y1) and (x2, y2) and so on. The last point becomes the new current point. Returns self.
If there is no current path when the method is invoked, a new path is automatically begun.
Examples:
canvas.polyline(50, 50, 150, 50, 150, 150, 50, 150, 50, 50).stroke
Returns the position (x,y) transformed by the current transformation matrix.
The resulting position should be interpreted in terms of the coordinate system of the context object (e.g. the page or Form XObject).
Appends a rectangle to the current path as a complete subpath (drawn in counterclockwise direction), with the bottom-left corner specified by x and y and the given width and height. Returns self.
If radius is greater than 0, the corners are rounded with the given radius.
Note that the rectangle degrades to a line if either width or height is zero and to nothing if both are zero.
If there is no current path when the method is invoked, a new path is automatically begun.
The current point is set to the bottom-left corner if radius is zero, otherwise it is set to (x, y + radius).
Examples:
canvas.rectangle(10, 110, 80, 50).stroke
canvas.rectangle(110, 110, 80, 50, radius: 10).stroke
canvas.rectangle(10, 90, 80, 0).stroke      # Degraded: Just a line
canvas.rectangle(110, 90, 0, 0).stroke      # Degraded: Draws nothing
The rendering intent is used to specify the intent on how colors should be rendered since sometimes compromises have to be made when the capabilities of an output device are not sufficient. The intent parameter can be one of the following symbols:
-
:AbsoluteColorimetric -
:RelativeColorimetric -
:Saturation -
:Perceptual
Returns the current rendering intent (see GraphicsState#rendering_intent) when no argument is given. Otherwise sets the rendering intent using the intent argument and returns self. The setter version can also be called in the rendering_intent= form.
If the intent and a block are provided, the changed rendering intent is only active during the block by saving and restoring the graphics state.
Examples:
canvas.rendering_intent(:Perceptual)
canvas.rendering_intent                      # => :Perceptual
canvas.rendering_intent = :Saturation        # => :Saturation

canvas.rendering_intent(:Perceptual) do
  canvas.rendering_intent                    # => :Perceptual
end
canvas.rendering_intent                      # => :Saturation
See: PDF2.0 s8.6.5.8, RenderingIntent
Returns the resource dictionary of the context object.
Restores the graphics state to the last saved version and returns self.
Must not be invoked more times than save_graphics_state.
Example:
canvas.save_graphics_state
canvas.circle(100, 100, 50).clip_path.end_path
canvas.fill_color("hp-blue").rectangle(0, 0, 100, 100).fill
canvas.restore_graphics_state
canvas.rectangle(100, 0, 100, 100).fill
See: PDF2.0 s8.4.2, save_graphics_state
Rotates the coordinate system angle degrees around the origin or around the given point and returns self.
If invoked with a block, the rotation of the coordinate system is only active during the block by saving and restoring the graphics state.
Note that the origin of the coordinate system itself doesn’t change even if the origin argument is given!
- origin
-
The point around which the coordinate system should be rotated.
Examples:
canvas.stroke_color("hp-gray-light").
  rectangle(0, 0, 60, 40).stroke           # The rectangle that gets rotated

canvas.rotate(45) do                       # Positive x-axis pointing to top-right corner
  canvas.stroke_color("hp-blue").
    rectangle(0, 0, 60, 40).stroke
end

canvas.rotate(-45, origin: [-50, -50]) do  # Rotate around (-50,-50)
  canvas.stroke_color("hp-orange").
    rectangle(0, 0, 60, 40).stroke
end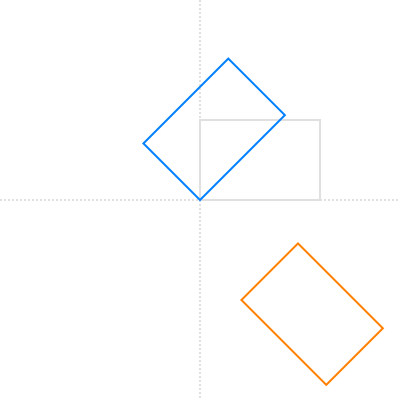
See: transform
Saves the current graphics state and returns self.
If invoked without a block a corresponding call to restore_graphics_state must be done to ensure proper nesting. Otherwise, i.e. when invoked with a block, the graphics state is automatically restored when the block is finished.
Any saved graphics states are also restored when the content stream associated with the canvas is serialized to ensure proper nesting.
Examples:
# With a block
canvas.save_graphics_state do
  canvas.stroke_color("hp-blue")             # After the block the color is reset
  canvas.line(20, 20, 70, 180).stroke
end
canvas.line(60, 20, 110, 180).stroke

# Same without a block
canvas.save_graphics_state.
  stroke_color("red").
  line(100, 20, 150, 180).stroke.
  restore_graphics_state
canvas.line(140, 20, 190, 180).stroke
See: PDF2.0 s8.4.2, restore_graphics_state
Scales the coordinate system sx units in the horizontal and sy units in the vertical direction and returns self. If the optional origin is specified, scaling is done from that point.
If invoked with a block, the scaling is only active during the block by saving and restoring the graphics state.
Note that the origin of the coordinate system itself doesn’t change even if the origin argument is given!
- origin
-
The point from which the coordinate system should be scaled.
Examples:
canvas.stroke_color("hp-gray-light").
  rectangle(10, 10, 10, 10).stroke        # The rectangle that gets scaled

canvas.scale(4, 2) do                     # Scale from origin
  canvas.stroke_color("hp-blue").
    rectangle(10, 10, 10, 10).stroke      # Actually (40, 20) to (80, 40)
end

canvas.scale(-2, 4, origin: [10, 10]) do  # Scale from (10, 10)
  canvas.stroke_color("hp-orange").
    rectangle(10, 10, 10, 10).stroke      # Actually (10, 10) to (-10, 40)
end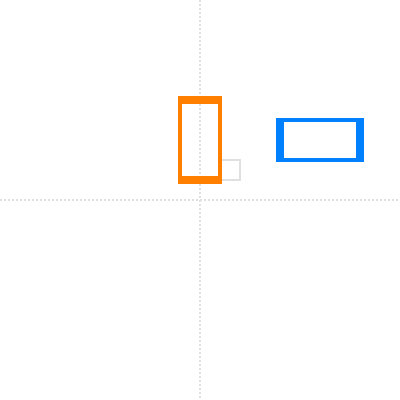
See: transform
Low-level method for actually showing text on the canvas. Returns self.
The argument glyphs needs to be a an array of glyph objects valid for the current font, optionally interspersed with numbers for kerning.
Text is always shown at the current position of the text cursor, i.e. the origin of the text matrix. To move the text cursor to somewhere else use move_text_cursor before calling this method.
The text matrix is updated to correctly represent the graphics state after the invocation. Since this is a compute intensive operation, use show_glyphs_only if you don’t need a correct text matrix.
This method is usually not invoked directly but by higher level methods like text.
Examples:
canvas.font("Helvetica", size: 10)
glyphs = canvas.font.decode_utf8("Some text here")
canvas.move_text_cursor(offset: [15, 100])
canvas.show_glyphs(glyphs)
canvas.text(canvas.text_cursor.map(&:to_i).join(", "), at: [15, 80])
See: text, text_cursor, text_matrix, move_text_cursor, show_glyphs_only
Same operation as with show_glyphs but without updating the text matrix.
This method should only be used by advanced text layouting algorithms which perform the necessary calculations themselves!
Warning: Since this method doesn’t update the text matrix, all following results from text_cursor and other methods using the current text matrix are invalid until the next call that sets the text matrix.
Examples:
canvas.font("Helvetica", size: 10)
glyphs = canvas.font.decode_utf8("Some text here")
canvas.move_text_cursor(offset: [15, 100])
canvas.show_glyphs_only(glyphs)
canvas.text(canvas.text_cursor.map(&:to_i).join(", "), at: [15, 80])
Skews the the x-axis by a degrees and the y-axis by b degress and returns self. If the optional origin is specified, skewing is done from that point.
If invoked with a block, the skewing is only active during the block by saving and restoring the graphics state.
Note that the origin of the coordinate system itself doesn’t change!
- origin
-
The point from which the axes are skewed.
Examples:
canvas.stroke_color("hp-gray-light").
  rectangle(10, 10, 40, 20).stroke      # The rectangle that gets skewed

canvas.skew(0, 30) do                   # Point (10, 10) is now actually (15, 10)
  canvas.stroke_color("hp-blue").
    rectangle(10, 10, 40, 20).stroke    # Now a parallelogram
end

canvas.skew(30, 30, origin: [-50, 50]) do  # Skew from (-50, 50)
  canvas.stroke_color("hp-orange").
    rectangle(-50, 50, 20, 20).stroke
end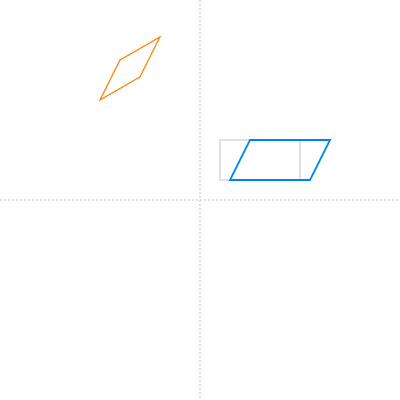
See: transform
Strokes the path and returns self.
Examples:
canvas.polyline(10, 10, 120, 40, 50, 160)
canvas.stroke
See: PDF2.0 s8.5.3.1, s8.5.3.2, close_stroke, close_fill_stroke
The stroke color defines the color used for stroking operations, i.e. for painting paths.
There are several ways to define the color that should be used:
-
A single numeric argument specifies a gray color (see
ColorSpace::DeviceGray::Color). -
Three numeric arguments specify an RGB color (see
ColorSpace::DeviceRGB::Color). -
A string in the format “RRGGBB” where “RR” is the hexadecimal number for the red, “GG” for the green and “BB” for the blue color value also specifies an RGB color.
-
As does a string in the format “RGB” where “RR”, “GG” and “BB” would be used as the hexadecimal numbers for the red, green and blue color values of an RGB color.
-
Any other string is treated as a color name.
HexaPDFsupports CSS Color Module Level 3 color names (see www.w3.org/TR/css-color-3/#svg-color) as well asHexaPDFdesign colors. -
Four numeric arguments specify a CMYK color (see
ColorSpace::DeviceCMYK::Color). -
A color object is used directly (normally used for color spaces other than DeviceRGB, DeviceCMYK and DeviceGray).
-
An array is treated as if its items were specified separately as arguments.
Returns the current stroke color (see GraphicsState#stroke_color) when no argument is given. Otherwise sets the stroke color using the given arguments and returns self. The setter version can also be called in the stroke_color= form.
If the arguments and a block are provided, the changed stroke color is only active during the block by saving and restoring the graphics state.
Examples:
canvas.line_width(5)

# With no arguments just returns the current color
canvas.stroke_color                        # => DeviceGray.color(0.0)

# Same gray color because integer values are normalized to the range of 0.0 to 1.0
canvas.stroke_color(102).rectangle(10, 170, 20, 20).stroke
canvas.stroke_color(0.4).rectangle(40, 170, 20, 20).stroke

# Specifying RGB color yellow in all possible formats
canvas.stroke_color(255, 255, 0).rectangle(10, 140, 20, 20).stroke
canvas.stroke_color(1.0, 1.0, 0).rectangle(40, 140, 20, 20).stroke
canvas.stroke_color("FFFF00").rectangle(70, 140, 20, 20).stroke
canvas.stroke_color("FF0").rectangle(100, 140, 20, 20).stroke
canvas.stroke_color("yellow").rectangle(130, 140, 20, 20).stroke

# Specifying CMYK colors
canvas.stroke_color(100, 100, 0, 60).rectangle(10, 110, 20, 20).stroke
canvas.stroke_color(1.0, 1.0, 0, 0.6).rectangle(40, 110, 20, 20).stroke

# Can use a color object directly, only numeric normalization is performed
color = HexaPDF::Content::ColorSpace::DeviceRGB.new.color(0, 255, 0)
canvas.stroke_color(color).rectangle(10, 80, 20, 20).stroke

# An array argument is destructured - these calls are all equal
canvas.stroke_color(0, 255, 0).rectangle(40, 80, 20, 20).stroke
canvas.stroke_color([0, 255, 0]).rectangle(70, 80, 20, 20).stroke
canvas.stroke_color = [0, 255, 0]
canvas.rectangle(100, 80, 20, 20).stroke

# As usual, can be invoked with a block to limit the effects
canvas.stroke_color(102) do
  canvas.stroke_color                      # => ColorSpace::DeviceGray.color(0.4)
end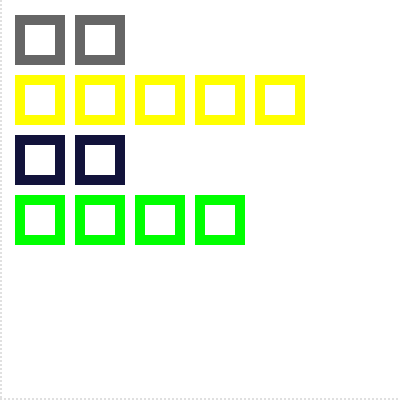
See: PDF2.0 s8.6, ColorSpace
Shows the given text string, either at the current or the provided position. Returns self.
If no position is provided, the text is positioned at the current position of the text cursor (see text_cursor).
The text string may contain any valid Unicode newline separator and if so, multiple lines are shown, using leading for offsetting the lines. If no leading has been set, a leading equal to the font size will be set..
Note that there are no provisions to make sure that all text is visible! So if the text string is too long, it may be outside the cropped page and be cut off.
Examples:
canvas.font('Times', size: 12)
# Sets leading=12 because mulitple lines are drawn
canvas.text("This is a \n    multiline text", at: [15, 150])
# Starts right after the last text
canvas.text(". Some more text\nafter the newline.")
See: leading, font, font_size, show_glyphs, www.unicode.org/reports/tr18/#Line_Boundaries
Returns the position of the text cursor, i.e. the origin of text space. This is where the first glyph of the next drawn text will be placed.
Note that this method can only be called while the current graphic object is a text object since the text matrix is otherwise undefined.
Examples:
canvas.font("Helvetica", size: 10)
canvas.text("Some sample text", at: [30, 150])
tx, ty = canvas.text_cursor                    # Cursor is directly after the text
canvas.stroke_color("hp-blue").
  circle(tx, ty, 0.5).
  circle(tx, ty, 5).stroke
canvas.text("Last cursor: (#{tx.round(2)}, #{ty.round(2)})", at: [30, 100])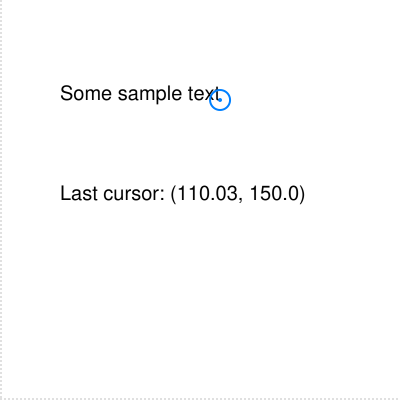
See: move_text_cursor
Sets the text matrix (and the text line matrix) to the given matrix and returns self.
The text matrix determines where and how the glyphs are rendered. The most common use is to translate the text space origin since the text drawing operations always use the text space origin as starting point for drawing the glyphs. This translation operation can more easily be specified using move_text_cursor.
The given values are interpreted as a matrix in the following way:
a b 0
c d 0
e f 1
If the current graphics object is not a text object, begin_text is automatically called because the text matrix is only available within a text object.
Examples:
canvas.font("Helvetica", size: 10)
canvas.begin_text                         # Not necessary
canvas.text_matrix(1, 0, 0, 1, 50, 100)   # Translate text origin to (50, 100)
canvas.text("This is some text")

canvas.text_matrix(2, 1, 3, 0.5, 50, 50)
canvas.text("This is some text")
See: PDF2.0 s9.4.2, move_text_cursor, text_cursor
The text rendering mode determines if and how glyphs are rendered.
The mode parameter can be one of the following (also see TextRenderingMode):
- :fill or 0
-
The text is filled (default)
- :stroke or 1
-
The text is stroked.
- :fill_stroke or 2
-
The test is filled, then stroked.
- :invisible or 3
-
The text is neither filled nor stroked.
- :fill_clip or 4
-
The text is filled and added to the clipping path.
- :stroke_clip or 5
-
The text is stroked and added to the clipping path.
- :fill_stroke_clip or 6
-
The text is filled, then stroked and added to the clipping path.
- :clip or 7
-
The text is added to the clipping path.
either be a valid integer or one of the symbols :fill, :stroke,
Note that the return value is always a normalized text rendering mode value.
Returns the current text rendering mode value (see GraphicsState#text_rendering_mode) when no argument is given. Otherwise sets the text rendering mode using the mode argument and returns self. The setter version can also be called in the text_rendering_mode= form.
If the mode and a block are provided, the changed text rendering mode is only active during the block by saving and restoring the graphics state.
Examples:
canvas.text_rendering_mode(:fill)
canvas.text_rendering_mode               # => #<NamedValue @name=:fill, @value = 0>
canvas.text_rendering_mode = :stroke     # => #<NamedValue @name=:stroke, @value = 1>

canvas.text_rendering_mode(3) do
  canvas.text_rendering_mode             # => #<NamedValue @name=:invisible, @value = 3>
end
canvas.text_rendering_mode               # => #<NamedValue @name=:stroke, @value = 1>

# visual example
canvas.font("Helvetica", size: 25)
canvas.stroke_color("green")
[:fill, :stroke, :fill_stroke, :invisible].each_with_index do |trm, index|
  canvas.text_rendering_mode = trm
  canvas.text("#{trm} text.", at: [20, 150 - 30 * index])
end
See: PDF2.0 s9.3.6, GraphicsState::TextRenderingMode
The text rise specifies the vertical distance to move the baseline up or down from its default location. Positive values move the baseline up, negative values down.
Returns the current text rise value (see GraphicsState#text_rise) when no argument is given. Otherwise sets the text rise using the amount argument and returns self. The setter version can also be called in the text_rise= form.
If the amount and a block are provided, the changed text rise is only active during the block by saving and restoring the graphics state.
Examples:
canvas.text_rise(5)
canvas.text_rise                      # => 5
canvas.text_rise = 10                 # => 10

canvas.text_rise(15) do
  canvas.text_rise                    # => 15
end
canvas.text_rise                      # => 10

# visual example
canvas.font("Helvetica", size: 10)
canvas.text_rise = 0                             # Set the default value
canvas.text("Hello", at: [20, 150])
canvas.text_rise = 10
canvas.text("from up here")
canvas.text_rise = -10
canvas.text("and also down here")
See: PDF2.0 s9.3.7
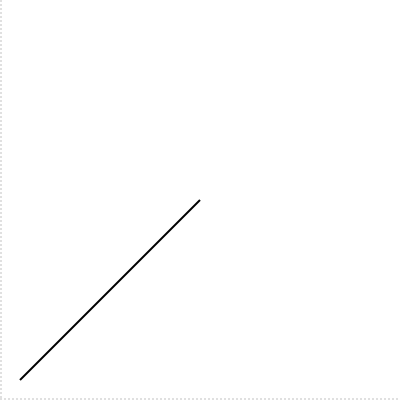
Transforms the coordinate system by applying the given matrix to the current transformation matrix and returns self.
If invoked with a block, the transformation is only active during the block by saving and restoring the graphics state.
The given values are interpreted as a matrix in the following way:
a b 0
c d 0
e f 1
Example:
canvas.transform(1, 0, 0, 1, 100, 100) do  # Translate origin to (100, 100)
  canvas.stroke_color("hp-blue").
    line(0, 0, 100, 50).stroke             # Actually from (100, 100) to (200, 150)
end
canvas.line(0, 0, 100, 50).stroke # Really from (0, 0) to (100, 50)![]()
See: PDF2.0 s8.3, s8.4.4
Translates the coordinate system coordinate system origin to the given x and y coordinates and returns self.
If invoked with a block, the translation of the coordinate system is only active during the block by saving and restoring the graphics state.
Examples:
canvas.stroke_color("hp-gray-light").
  rectangle(0, 0, 40, 20).stroke          # Rectangle from (0, 0) to (40, 20)
canvas.translate(50, 50) do               # Origin is now at (50, 50)
  canvas.stroke_color("hp-blue").
    rectangle(0, 0, 40, 20).stroke        # Actually (50, 50) to (90, 70)
end![]()
See: transform
If the font’s PDF encoding supports this, the word spacing determines how much additional space is added when the ASCII space character is encountered in a text. For horizontal writing positive values increase the distance between two words, whereas for vertical writing negative values increase the distance.
Important: In HexaPDF only the standard 14 PDF Type1 fonts support this property! When using any other font, for example a TrueType font, this property has no effect.
Returns the current word spacing value (see GraphicsState#word_spacing) when no argument is given. Otherwise sets the word spacing using the amount argument and returns self. The setter version can also be called in the word_spacing= form.
If the amount and a block are provided, the changed word spacing is only active during the block by saving and restoring the graphics state.
Examples:
canvas.word_spacing(0.25)
canvas.word_spacing                      # => 0.25
canvas.word_spacing = 0.5                # => 0.5

canvas.word_spacing(0.10) do
  canvas.word_spacing                    # => 0.10
end
canvas.word_spacing                      # => 0.5

# visual example
canvas.font("Helvetica", size: 10)
canvas.word_spacing = 0                  # initial value
canvas.text("This is an example text.", at: [10, 150])
canvas.word_spacing = 10
canvas.text("This is an example text.", at: [10, 100])
See: PDF2.0 s9.3.3, character_spacing, horizontal_scaling
Draws the given XObject (either an image XObject or a form XObject) at the specified position and returns the XObject.
Any image format for which a HexaPDF::ImageLoader object is available and registered with the configuration option ‘image_loader’ can be used. PNG (lossless), JPEG (lossy) and PDF (vector) images are supported out of the box.
If the filename or the IO specifies a PDF file, the first page of this file is used to create a form XObject which is then drawn.
The at argument has to be an array containing two numbers specifying the bottom-left corner at which to draw the XObject.
If width and height are specified, the drawn XObject will have exactly these dimensions. If only one of them is specified, the other dimension is automatically calculated so that the aspect ratio is retained. If neither is specified, the width and height of the XObject are used (for images, 1 pixel being represented by 1 PDF point, i.e. 72 DPI).
Note: If a form XObject is drawn, all currently set graphics state parameters influence the rendering of the form XObject. This means, for example, that when the line width is set to 20, all lines of the form XObject are drawn with that line width unless the line width is changed in the form XObject itself.
Examples:
canvas.xobject(machu_picchu, at: [10, 10], width: 90)        # bottom left

file = File.new(machu_picchu, 'rb')                          # top left
canvas.xobject(file, at: [10, 110], height: 50)

image = doc.images.add(machu_picchu)
canvas.xobject(image, at: [110, 10], width: 50, height: 90)  # bottom right

form = doc.add({Type: :XObject, Subtype: :Form, BBox: [0, 0, 100, 100]})
form.canvas.stroke_color("hp-blue").line(10, 10, 90, 90).stroke
canvas.line_width = 20
canvas.xobject(form, at: [100, 100])                         # top right
See: PDF2.0 s8.8, s.8.10.1, HexaPDF::Type::Image, HexaPDF::Type::Form, HexaPDF::ImageLoader